• Bio and legaleeze
  • Plant & Tree Inventory
  • Wildlife

permie love

~ permaculturist + master gardener

permie love

Category Archives: love tips

love tip #12: spring wild edibles and medicinals

06 Wednesday May 2015

Posted by Dusty Lynn Baker in love tips

≈ Leave a comment

Tags

Bloodwort, Columbine, Eastern Redbud, edible, forest, gardening, herbal, love tip, medicinal, permaculture, spring, sustainability, Trillium, woods

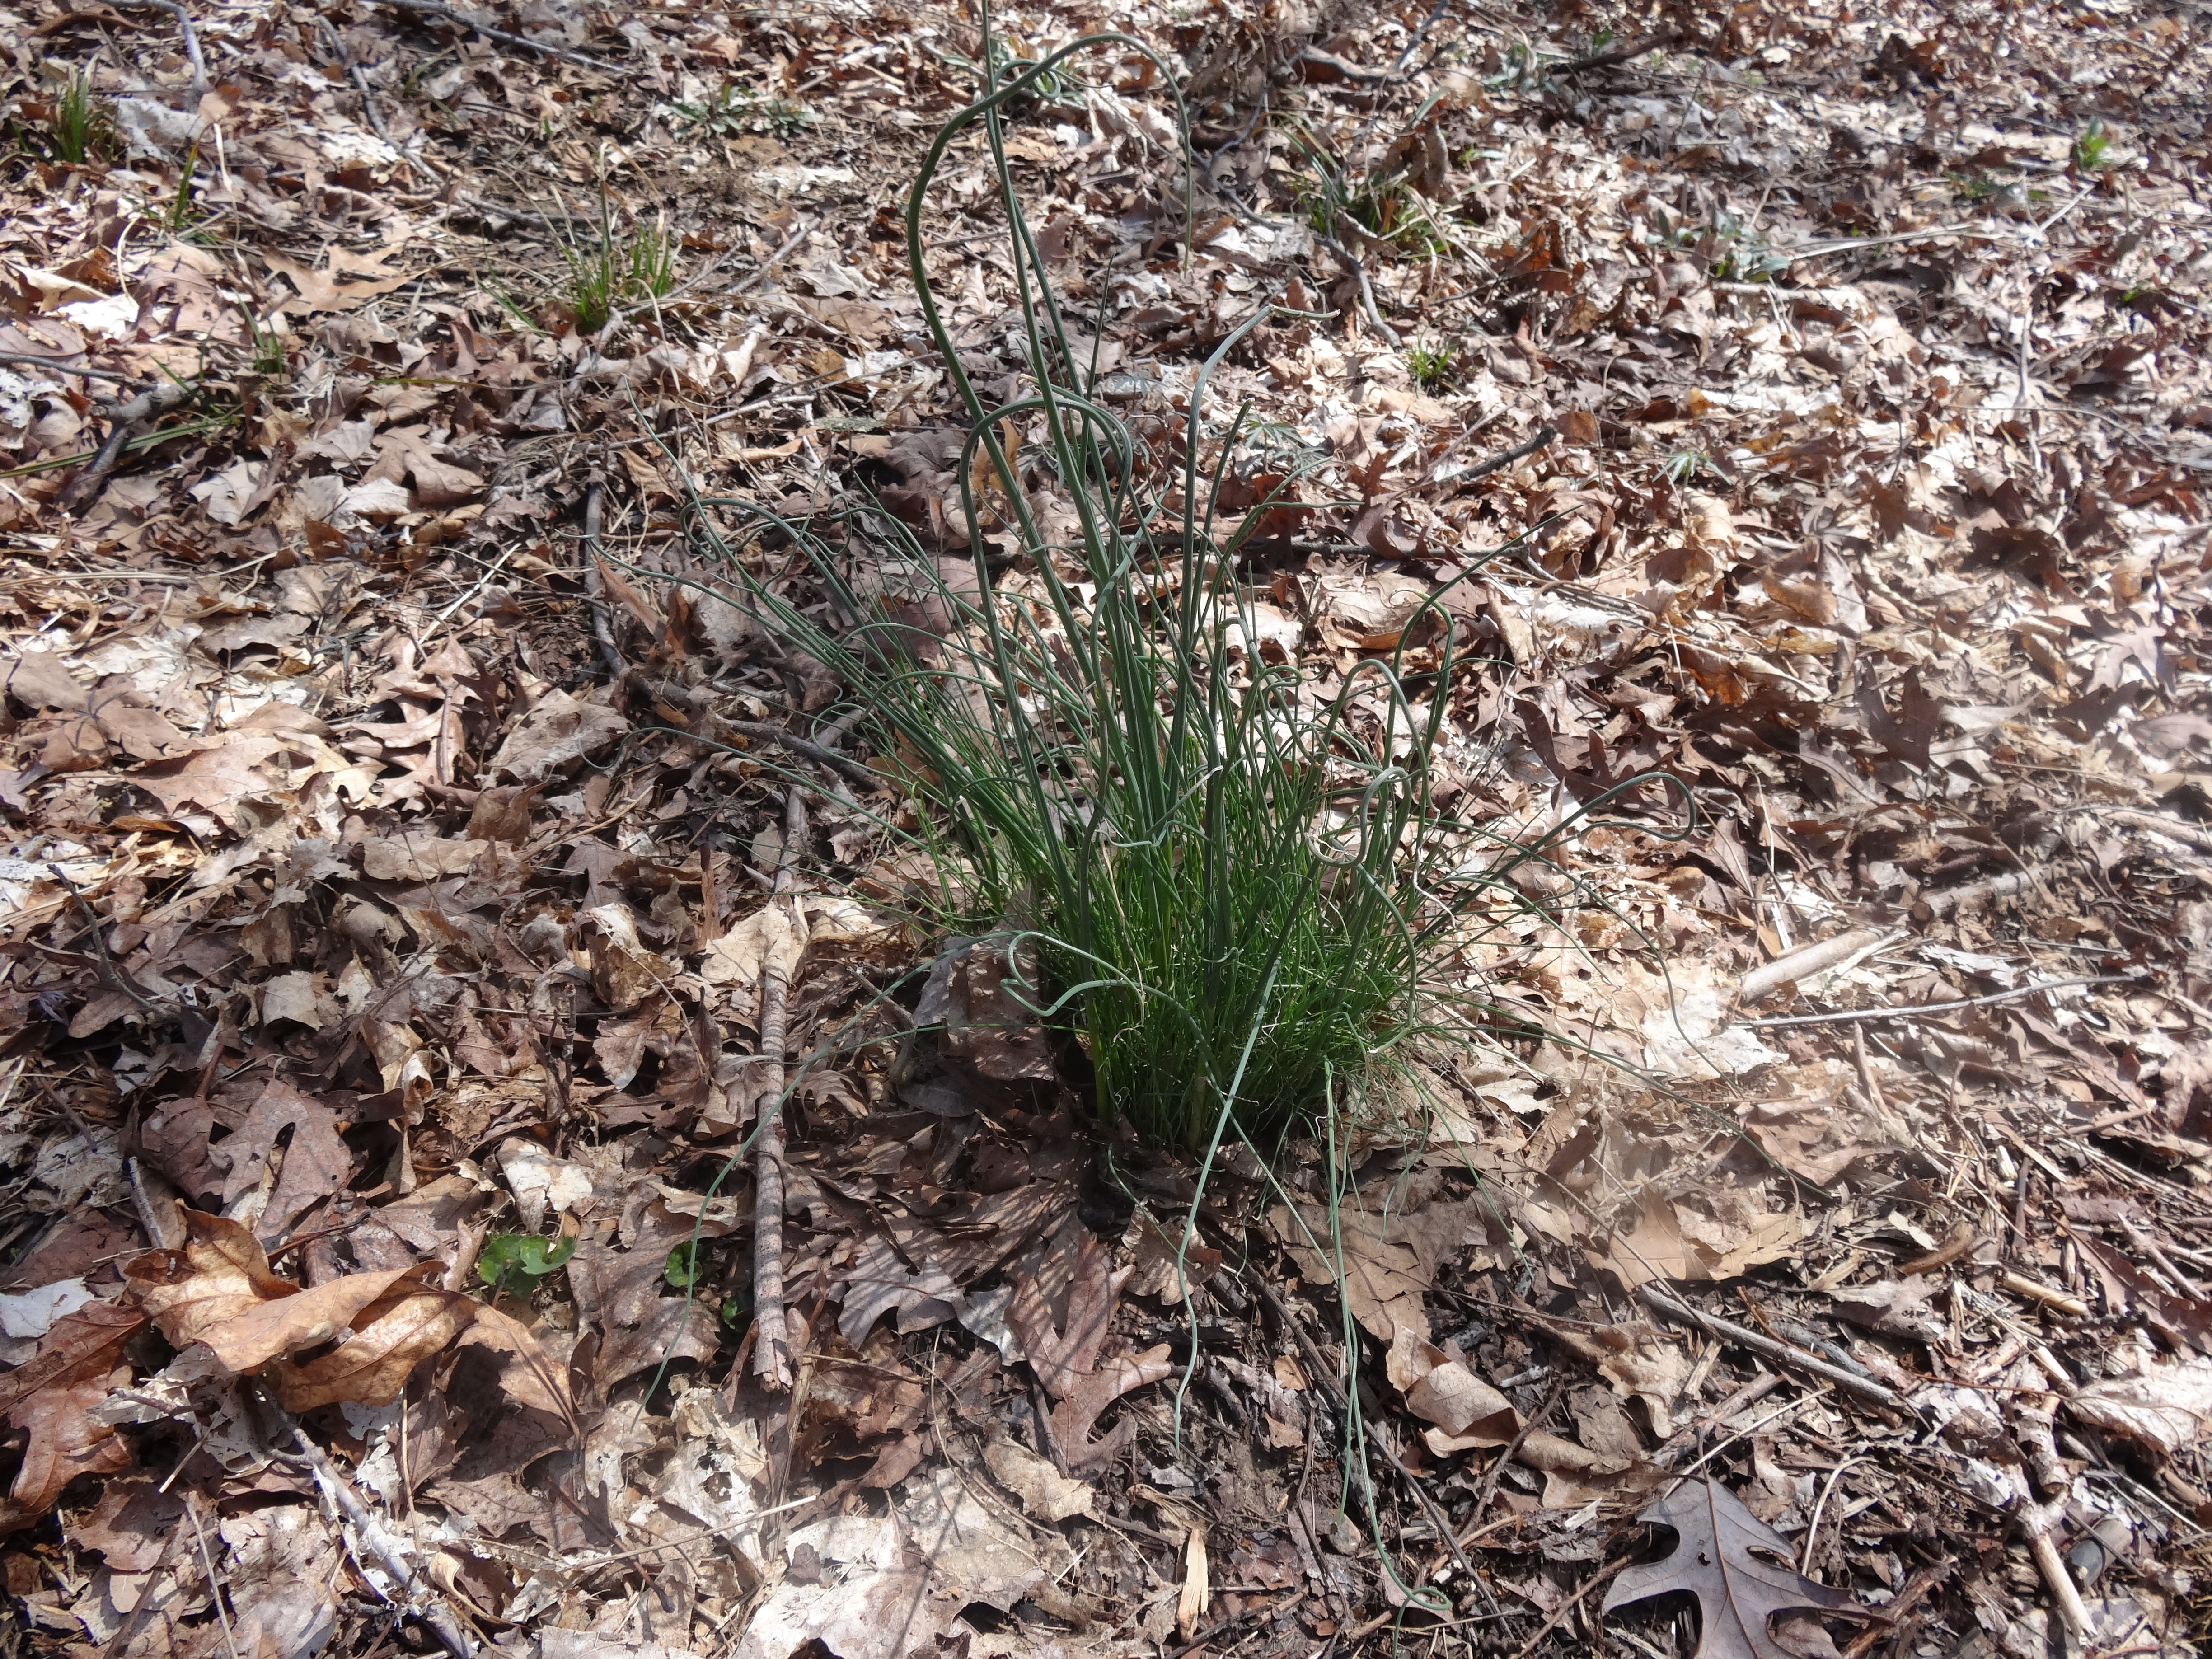
It is so important to know what is already growing nearby!

I’ve been busy combing my woods lately and I’ve found many new edibles and herbals/medicinals.  These are all early spring/spring bloomers.

Bloodwort/Bloodroot

Bloodwort/Bloodroot

Bloodroot/Bloodwort — (Caution: Bloodroot must be used with extreme caution and under professional care!)  Medicinal uses: mainly for bronchial problems and severe throat infections, pharma uses mixed with other compounds to treat heart problems, treating migraines, and in dental uses.  The paste is used externally for skin diseases/cancer, warts, tumors and ringworms.  The root has many uses as a dye and anesthetic/expectorant.
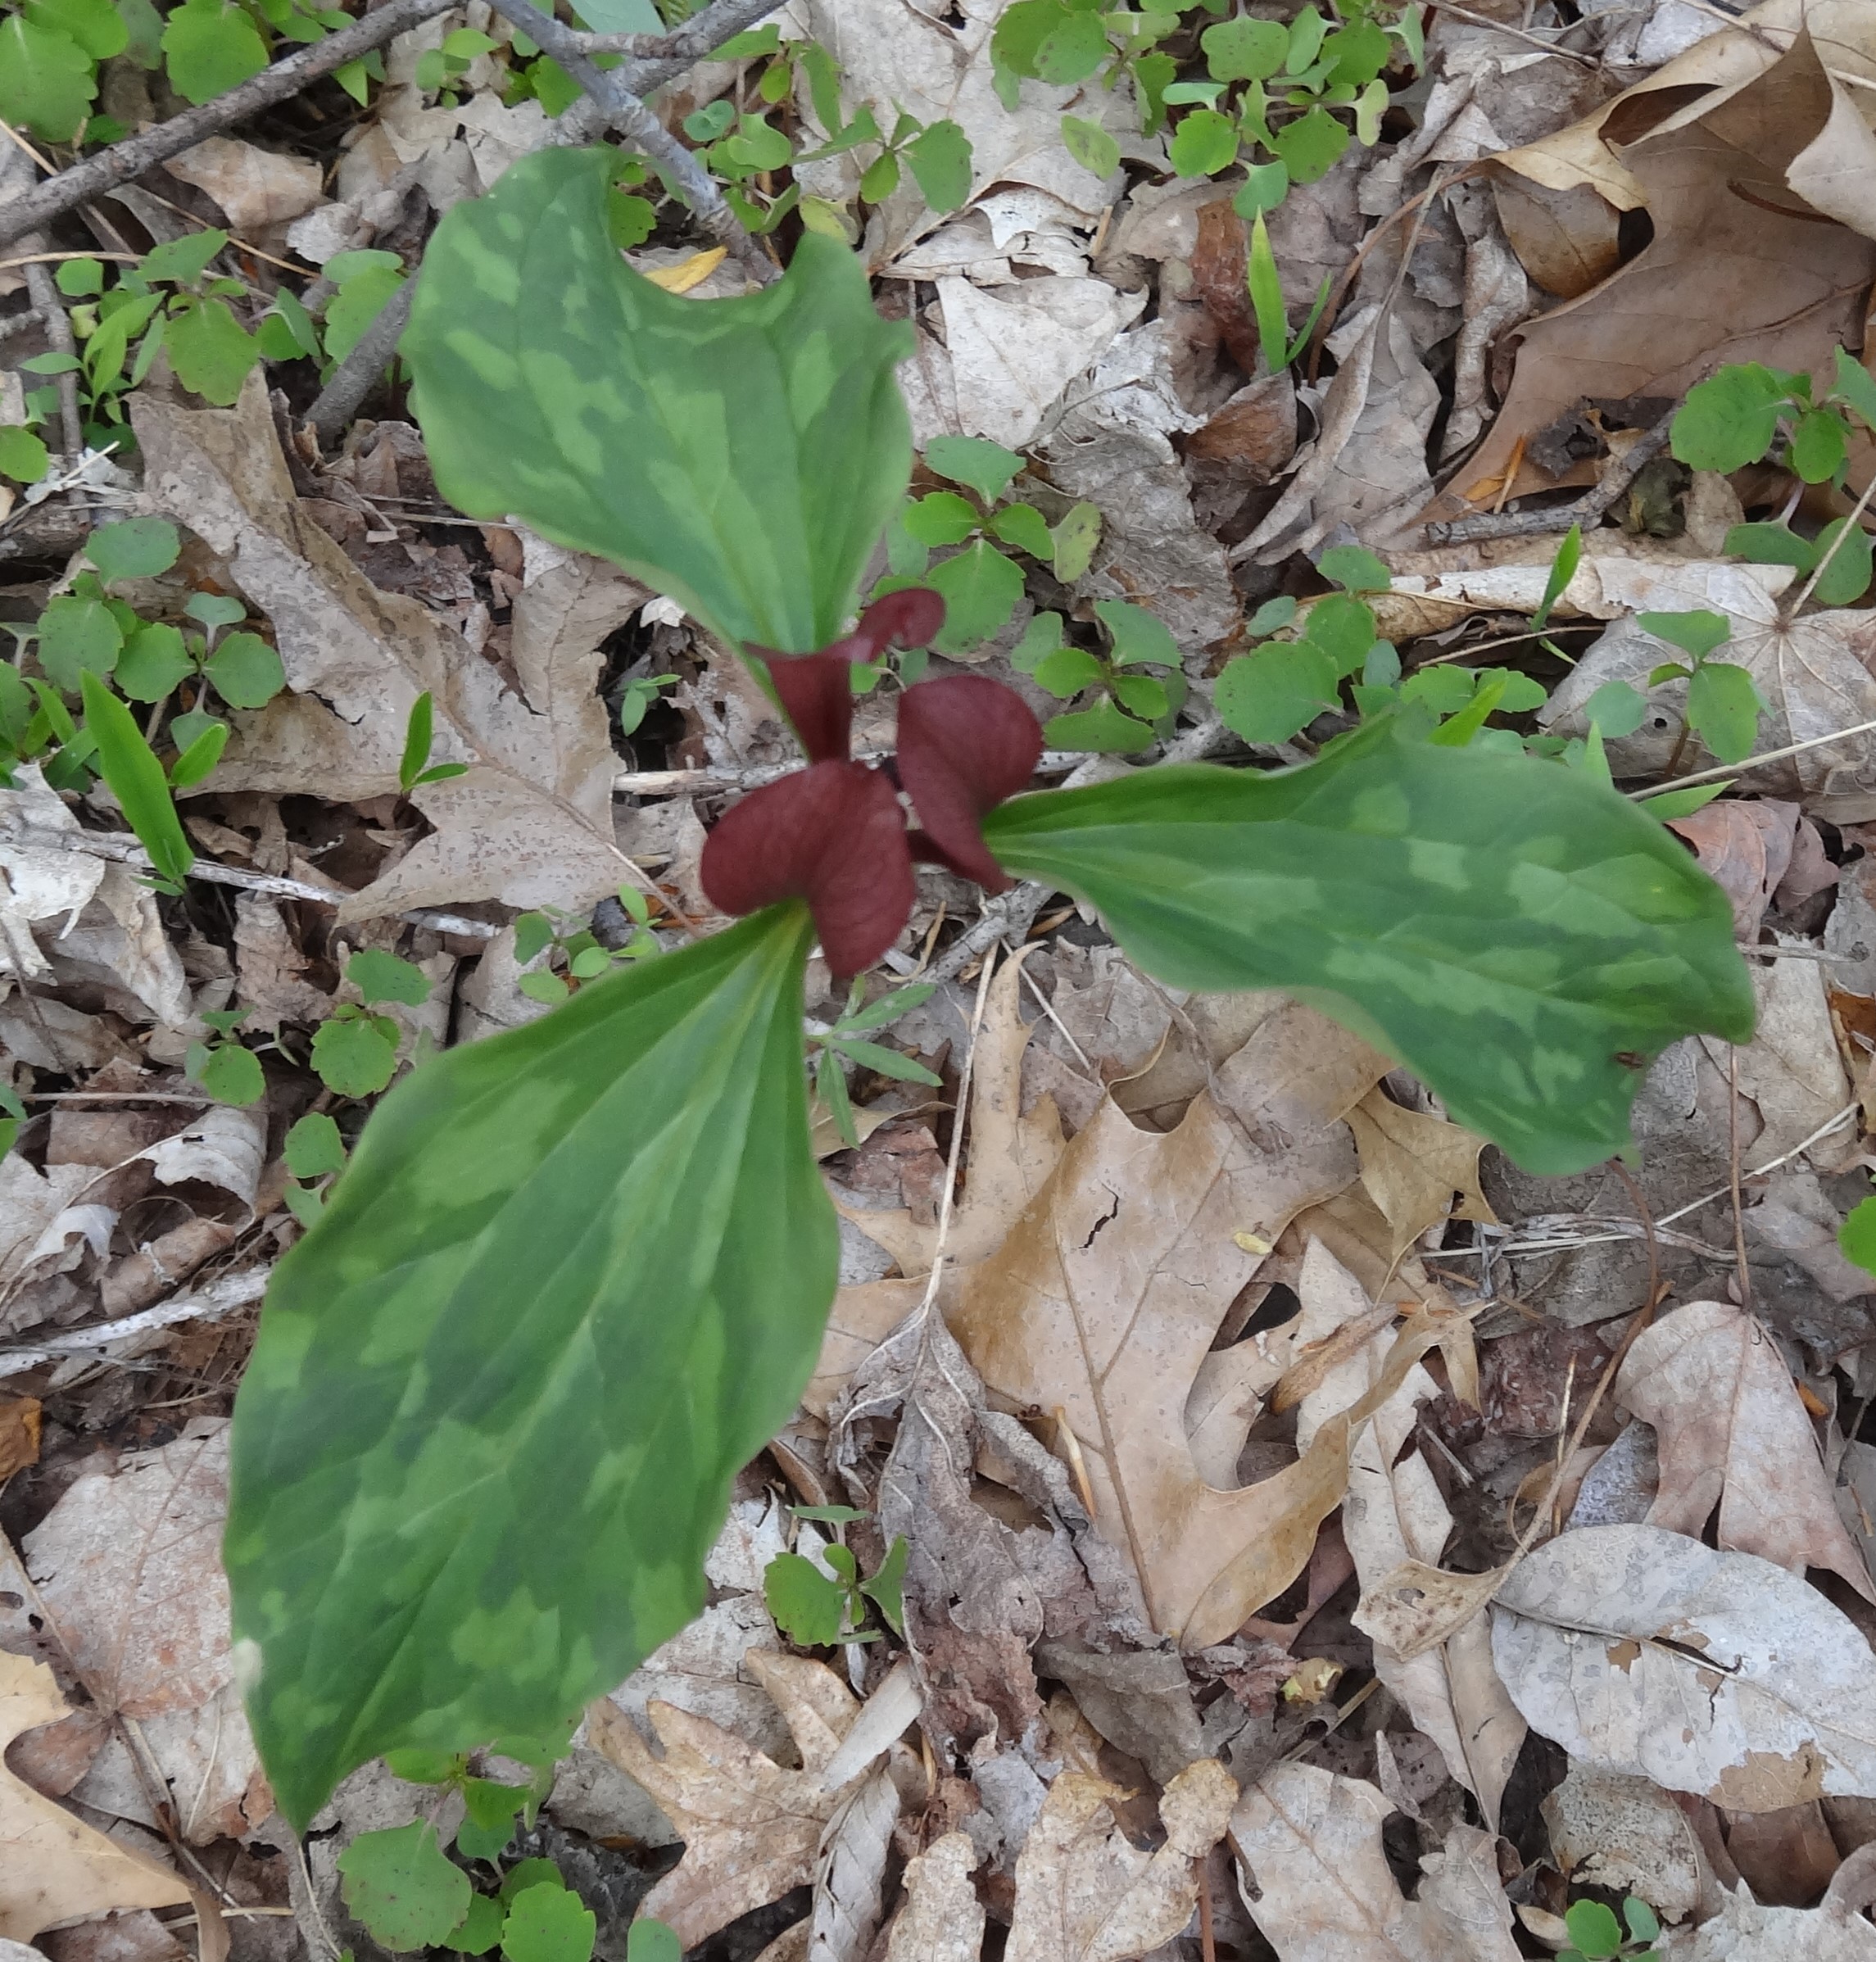
Trillium

Trillium

Trillium — The young unfolding leaves are edible raw or cooked as a pot herb.  The root has many medicinal uses as an antiseptic, diuretic, and ophthalmic and can be boiled, grated, and/or made into a poultice for external use on the eyes to reduce swelling or to reduce joint aches and inflammation.
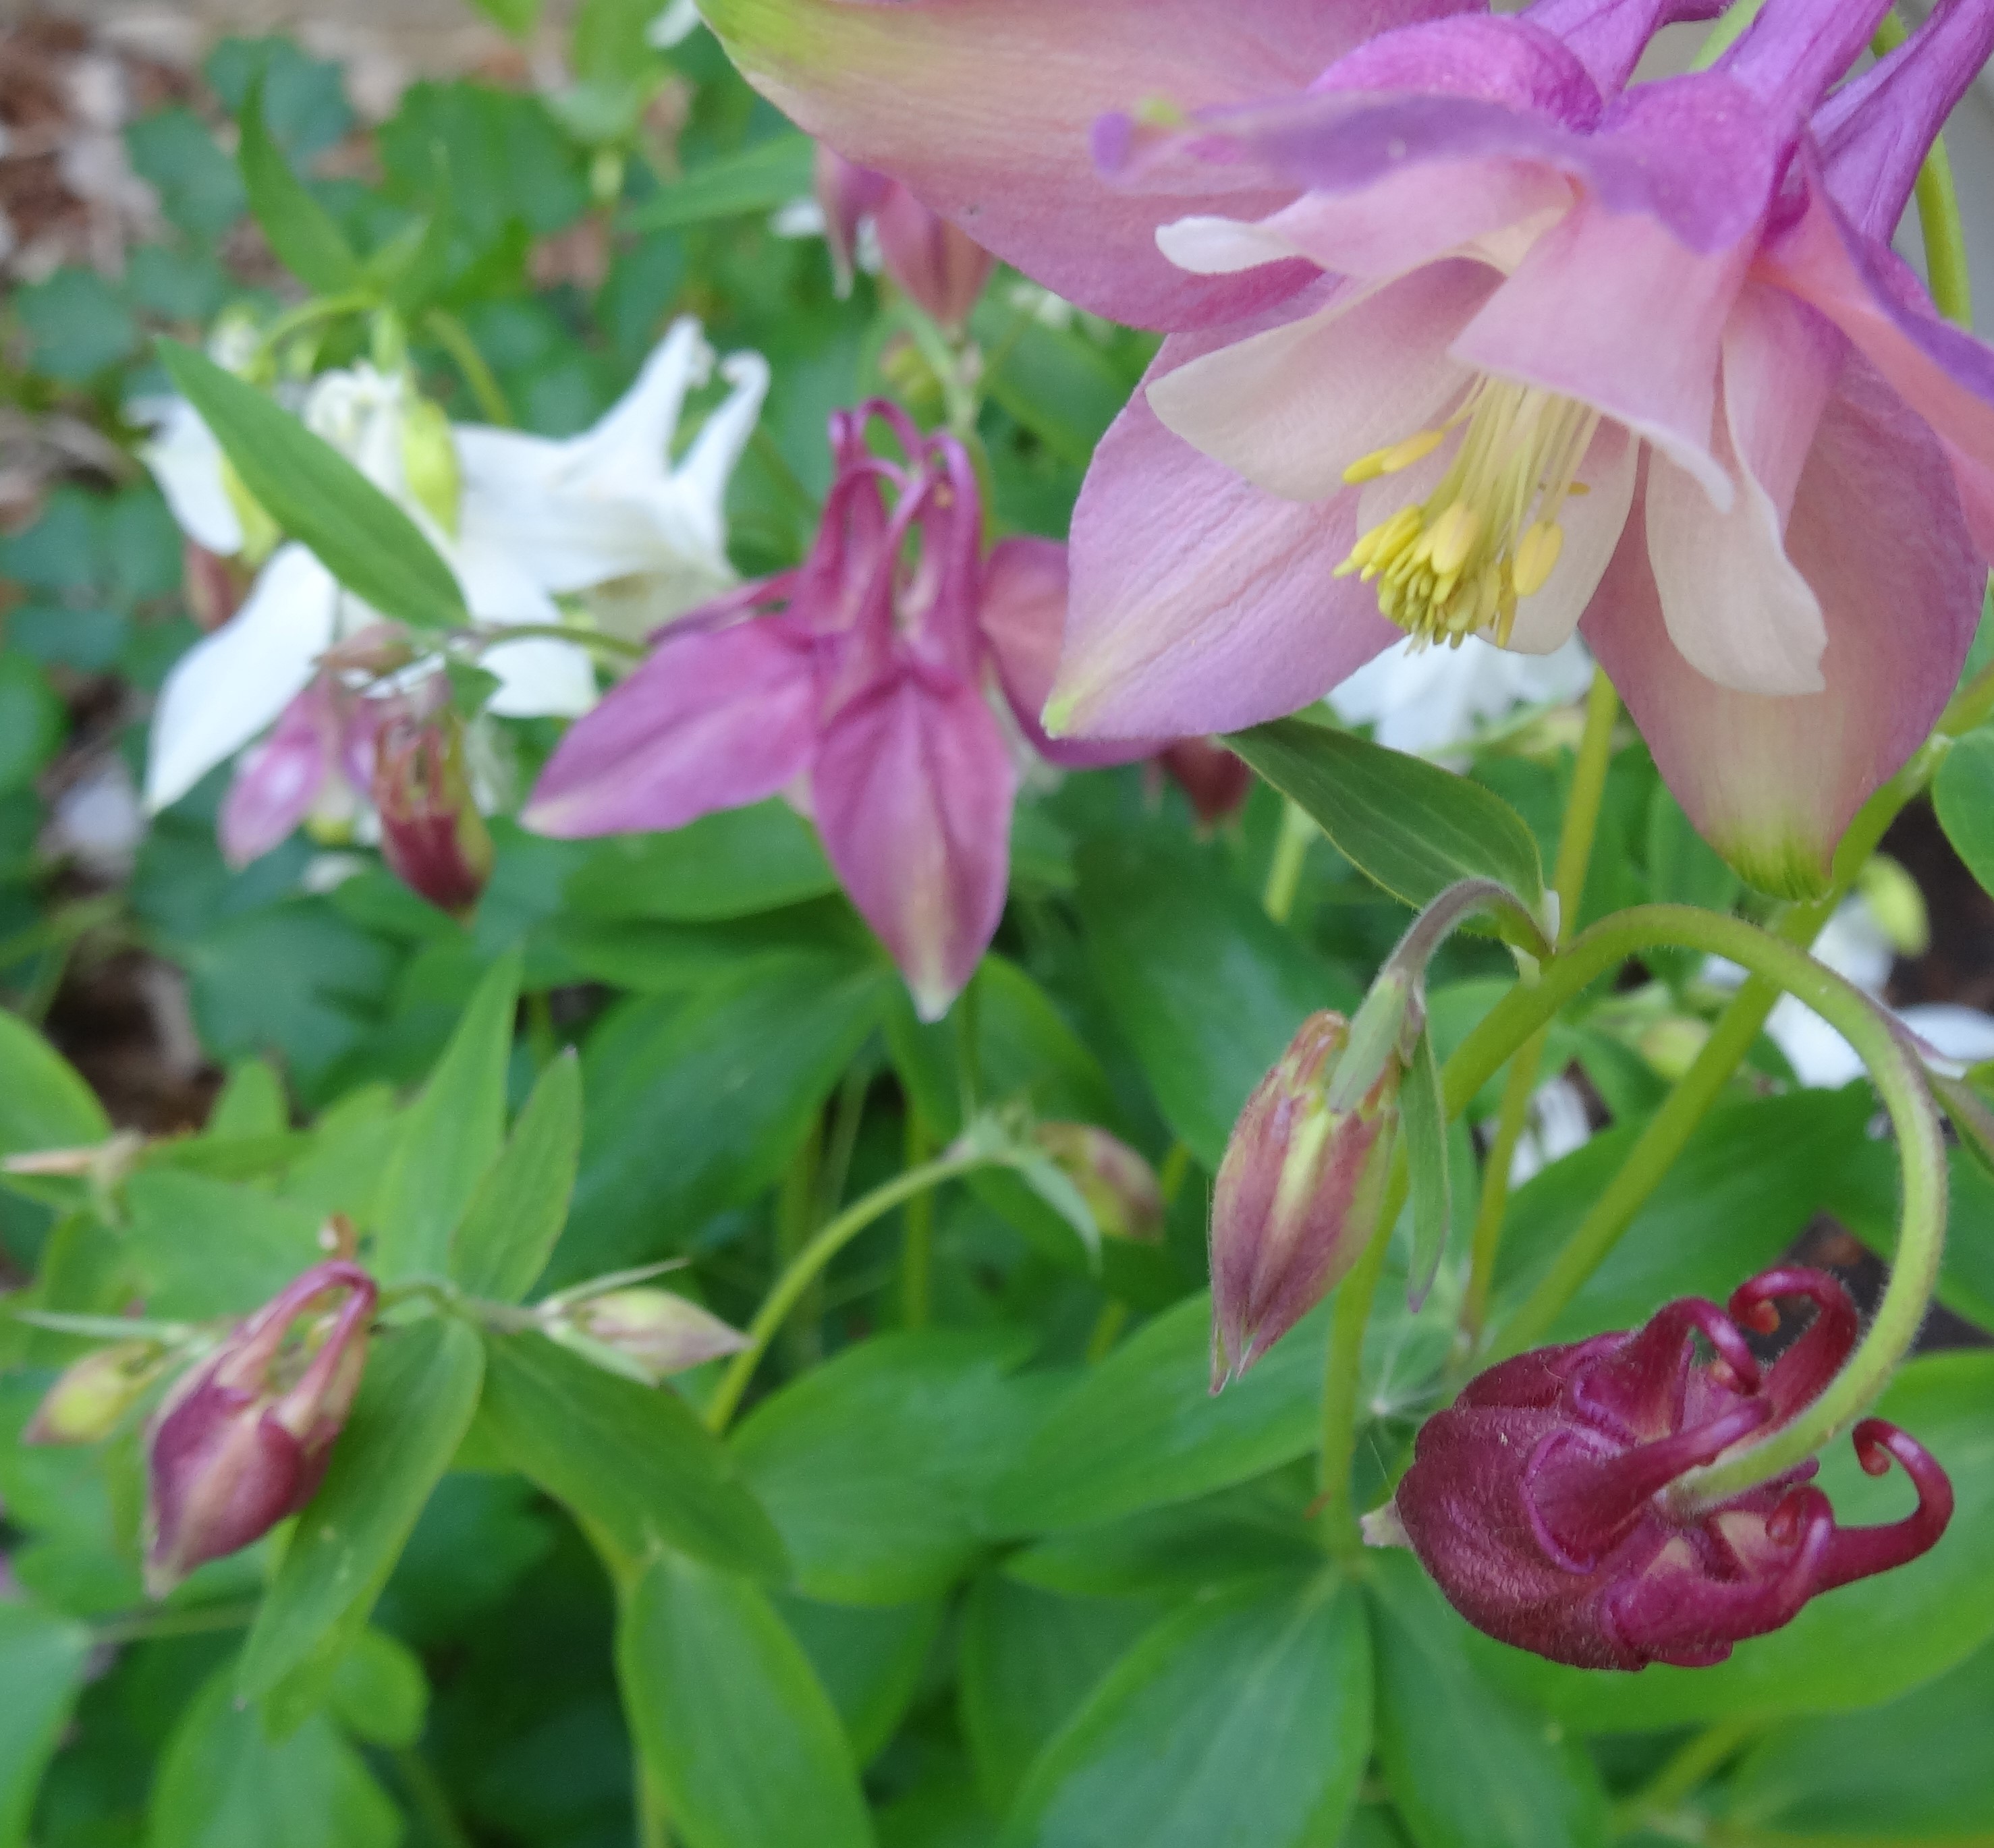


Dragonfly Columbine

Dragonfly Columbine

Columbine — A flower that is both beautiful and edible.  The flowers are high in nectar and therefore can have a hint of sweetness.  The roots are used to stop diarrhea and the flowers and seeds are used for the liver, jaundice, and kidney stones.  Leaves are used for aches and mouth/throat sores as lotions.


cropped-dsc02317-2.jpg

Eastern Redbud

Eastern Redbud Tree — Another pretty flower that is also edible raw or pickled while also rich in vitamin C; buds can be used as a caper.  The inner bark can be made into a tea creating strong astringent.  Redbuds are also used to treat fevers, diarrhea, dysentery, whooping cough and congestion.


Please remember to use home remedies with caution, and to always ensue proper identification.  The information here in no way substitutes professional advice for ailments and/or use of the plants listed!


Share this:

  • Click to email a link to a friend (Opens in new window)
  • Click to share on Twitter (Opens in new window)
  • Click to share on Reddit (Opens in new window)
  • Click to share on Facebook (Opens in new window)
  • Click to share on Pinterest (Opens in new window)
  • Click to print (Opens in new window)
  • More
  • Click to share on LinkedIn (Opens in new window)

Like this:

Like Loading...

love tip #11: scratch tastes better

22 Sunday Feb 2015

Posted by Dusty Lynn Baker in love tips

≈ Leave a comment

Tags

backpacker, baking mix, Belgian, biscuits, buttermilk, flapjacks, grandmother, griddle, Gypsy Preparers, love tip, pancakes, permie love, toppings, waffles

Shhh!  The most delicious foods are often the most simple to create!

Dusty’s Core Baking Mix

Since active with the Gypsy Preparers, I’ve been asked to share my grandmother’s core recipe for basic baking mix.  Since she didn’t actually measure her ingredients, I have adapted what I learned into measured recipes that I’m able to create off the top of my head for everyday use.

Flapjack mix

Dusty’s Flapjack mix, http://www.permielove.com

Everything starts with the Core recipe.  Mine is a simple mix of:

  • 3 cups all purpose flour
  • 1/3 cup sugar
  • 3 tablespoons baking powder
  • 1 teaspoon salt

> Basic pancakes: add egg and milk (I scoop about 4-5 heaping tablespoons of this mix into a bowl, add 1 beaten egg and milk to desired texture.)  I use a griddle with cooking spray, flipping the pancakes as soon as bubbles begin to open.  If your pancakes are dry, thin the mix with milk and flip your pancakes sooner.

> Basic waffles: add egg and milk as above, plus 1 tablespoon oil or shortening (I prefer olive oil.)  The fat adds that bit of crisp to the cooked product and is more like the Belgian Waffles I remember from when I lived near Brussels!

> Flapjacks: raise sugar to 1/2 cup and add 1/2 cup cornmeal, prepare the same as Basic pancakes.

> Biscuit mix: add 1/3 cup chilled shortening to the Core recipe, cutting it in quickly and then adding just enough water or buttermilk to form drop biscuits for baking.  You can also reduce the sugar and raise the salt to desired taste.

> Backpacker’s mix: add 1/3 cup powdered milk and powdered eggs as desired to Core recipe, when ready to use, spoon out desired amount and add water until desired consistency.

Don’t forget to add your favorite toppings!  Although I will mix mashed bananas right into the pancake mix, I add all other toppings just after pouring the mix onto the griddle, immediately adding blueberries, chopped chocolate, etc., to allow the ingredients to cook into the mix and warm well.

*** You can even make your own buttermilk quickly and easily using fresh milk with lemon juice or white vinegar.  Simply put 1 tablespoon of either acid into a measuring cup, then fill to 1 full cup with milk.  In 5-10 minutes you will have buttermilk ready to use!

Please remember when sharing to credit content and photos to permie love!  Thank you!

Share this:

  • Click to email a link to a friend (Opens in new window)
  • Click to share on Twitter (Opens in new window)
  • Click to share on Reddit (Opens in new window)
  • Click to share on Facebook (Opens in new window)
  • Click to share on Pinterest (Opens in new window)
  • Click to print (Opens in new window)
  • More
  • Click to share on LinkedIn (Opens in new window)

Like this:

Like Loading...

love tip #10: gathering seeds

05 Sunday Oct 2014

Posted by Dusty Lynn Baker in love tips

≈ Leave a comment

Tags

Black-Eyed Susan, bulbs, Fall, gardening, gathering, love tips, Mother Nature, plants, Seed Savers Exchange, seeds, storage, trees, Tulip Tree, wildflowers

As I return to the world-wide web and all of its wonders, I’m also returning to my land and gathering seeds from the finest of the plants–ones that I will want to plant more of in the coming seasons.

Seeds collected today from my property

Seeds collected today from my property

How does one know which seeds are ready and how to store them?  These are questions that can be answered in general, but also with a unique answer for each plant type.  Confusing?  Well, yes and no.

The best answer is that Mother Nature lets you know when things are ready!  Plants and/or their seeds either dry up, drop from the plant, are blown in the wind, or as hikers and pet owners both know, are carried inside on humans and furry pets alike.

  • My Black-Eyed Susans have big dried seed-cones that I’m able to clip whole and store.
  • My Eastern Redbuds have bean pods that have dried and browned and are just starting to fall.  (These have gorgeous flowers in the Spring.)
  • And, although the Pin Oaks’ acorns are still green, they are falling to the ground, thus telling me that they are ready to be gathered as they will dry and brown within the week.  (Our squirrels bury their seeds rather than store them, losing most, so I’ll save these to give to them in winter!)
  • Without seeds, I still have baby Tulip Trees that have volunteered themselves in my flower beds.  I let them have their way in the flower beds this past summer and now, with just one growing season, they are 2-3 feet tall and ready to transplant once their leaves drop.
  • And don’t forget Hostas and spring/early summer bulb plants.  With fall comes the perfect time to move, divide and conquer many of these so that they will be in place and ready to grow as soon as nature commands in the Spring.

As for storage, everything has its own rules but nearly all require time to dry (lowering moisture) and storage in a cool, dry, dark place until ready for planting.  And while some say that the seeds must be in breathable containers (such as paper), others swear by their old habits of using sealed glass jars such as canning jars, or old mayo or pickle jars, or plastic zipper bags.

Gathered wildflower and tree seeds in Mason jars

Gathered wildflower and tree seeds in canning jars

I say to each his own.  If you’re worried about a particular seed, research it to find out if it has any special needs.  For example, my PawPaws have seeds, but they have extremely particular growing needs that are difficult to reproduce.  But regardless, don’t fret, take on the challenge to keep your favorites and enjoy the process as it plays out.

To see some of the plants listed above, visit my plant inventory page.

You can also visit Seed Savers Exchange for more information on the process and to gain access (via membership) to a seed exchange service.


Share this:

  • Click to email a link to a friend (Opens in new window)
  • Click to share on Twitter (Opens in new window)
  • Click to share on Reddit (Opens in new window)
  • Click to share on Facebook (Opens in new window)
  • Click to share on Pinterest (Opens in new window)
  • Click to print (Opens in new window)
  • More
  • Click to share on LinkedIn (Opens in new window)

Like this:

Like Loading...

love tip #9: the dreaded Black Walnut

10 Thursday Apr 2014

Posted by Dusty Lynn Baker in love tips

≈ Leave a comment

Tags

Black Walnut, blackberry, blueberry, compost, gardening, juglone, love tip, planting, raised beds, sensitive plants, squirrels, toxicity

It happened to me.  Yes, even me.  I went out last week and planted a blackberry bare-root in the yard and was just about to go out and add a blueberry to the that ‘perfect’ location when … when … I found the evidence.  The squirrels had been busy (thankfully) and had exposed a large stash of Black Walnuts meaning there had to be a tree nearby.  So, even though leaves are bare, I set out and found the culprit.

Black WalnutsNo, I won’t cut it down.  It’s useless, that is unless I plan on waiting about 20 years for the roots to compost fully.  I just have to rearrange. The blackberry will be moved and I will seek out a new home for the blueberry bush.

Unfortunately, that’s a tall task.  The tree is huge and it’s roots are far spread and I have a very limited open area nestled in thick woods.  I do have two tillable acres on the front of the property but the field can’t be seen in summer when the trees are full and I’ve no plan on providing the neighbors with a plentiful bounty.

Natural and manmade fences and an open view to the front acreage is planned but that’s down the road and not today.  Instead, I search and in the next week or so I replant.  Or do I dream of a beautiful Black Walnut hutch in my future?

Visit the Wisconsin Horticulture Extension website for a chart of plants that are both sensitive and not sensitive to juglone, the toxic substance produced heavily by Black Walnut trees.  And remember that even sensitive plants can often be grown in the vicinity of Black Walnut if they are grown in raised beds, keeping their roots above ground level.

Share this:

  • Click to email a link to a friend (Opens in new window)
  • Click to share on Twitter (Opens in new window)
  • Click to share on Reddit (Opens in new window)
  • Click to share on Facebook (Opens in new window)
  • Click to share on Pinterest (Opens in new window)
  • Click to print (Opens in new window)
  • More
  • Click to share on LinkedIn (Opens in new window)

Like this:

Like Loading...

love tip #8: plants with wet feet

07 Monday Apr 2014

Posted by Dusty Lynn Baker in love tips

≈ Leave a comment

Tags

benefit, flooding, gardening, hardiness zones, medicinal, perennials, puddles, rain, rooting hormone, shrubs, sustainability, trees, wet feet, Witch Hazel

So many of us panic when the rains arrive as small puddles form, then larger puddles, and then entire areas of our yard or acreage are overtaken by low-level flooding.  But is this always a bad thing?

As the rains came this past week (and yet more today) the approximately 4″ of rain in as many days has allowed me to find out where there are unexpected low areas on my property, allowing me to decide if I need to fill, line with wood chips, or just find an accommodating plant that enjoys and endures a little wet feet every now and then.

Wood chips are needed around the base of the composter.  But with a closer look, a puddle behind and to the right on the edge of the woods shows an ideal spot for a Blueberry patch.

Wood chips are needed around the base of the composter. But with a closer look, a puddle behind and to the right on the edge of the woods shows an ideal spot for a Blueberry patch.

Trees that accommodate wet feet are Willows, Red Maples, and some Magnolias and Dogwoods.  Willows must be placed carefully because they will seek out any and all water in their range, including any type of underground water or drainage/sewage lines within their reach.  Bald Cyprus will handle wet feet but if you are looking for an evergreen these will not do as they are true their name by dropping many of their needles in the late fall.  Some shrubs to consider are Blueberries, Witch Hazel, Holly and Anise.

Witch Hazel
Blueberries
Willow

When making your decisions, remember to consider sustainability and hardiness zones.  Of those mentioned, Willows are a base for making homemade rooting hormone, Witch Hazel has many medicinal values and of course Blueberries are both healthy and delicious.

this

This photo shows water settling below the driveway edge and in a lawn area between an Oak tree and the sidewalk to the house.  As this is the access area for the backyard, propane, etc., it’s not an ideal place for a planting and needs to be backfilled and reseeded so that the water will drain on the natural slope

So seek out the many additional options for your location.  And remember that perennials will not only provide you with benefits year after year, but if suited to your zone, they will not be so needing and craving your attention when gardening chores come due.

Share this:

  • Click to email a link to a friend (Opens in new window)
  • Click to share on Twitter (Opens in new window)
  • Click to share on Reddit (Opens in new window)
  • Click to share on Facebook (Opens in new window)
  • Click to share on Pinterest (Opens in new window)
  • Click to print (Opens in new window)
  • More
  • Click to share on LinkedIn (Opens in new window)

Like this:

Like Loading...

love tip #7: identifying edible wild garlic

18 Tuesday Mar 2014

Posted by Dusty Lynn Baker in love tips

≈ Leave a comment

Tags

bulb, edible weeds, education, flavor, hollow stem, identification, plants, salad, stem, taste, weeds, wild garlic, wild onion, yard grass

It’s that time of year.  The wild garlic has sprouted up in my yard in what seems like overnight and I’m ready to start using it in my recipes.  But, how do I know if it’s edible?  And how can I tell if it’s wild onions or wild garlic popping up?

Wild garlic growing in the woods by my house.  It looks like grass at first glance, but closer up it reveals its similarity to green onions or chives.  It is also far outpacing the yard grass in this cool weather.

Wild garlic growing in the woods by my house. It looks like grass at first glance, but closer up it reveals its similarity to green onions or chives. It is also far outpacing the yard grass in this cool weather.

A full wild garlic bulb with stem pulled from the back, left of the clump in the above picture.

A full wild garlic bulb with stem pulled from the back, left of the clump in the above picture.

Wild garlic is identified from wild onion due to it's hollow stem.

Wild garlic is identified by its garlic/onion odor and hollow stem.  Wild onions have a flattened stem.

How the wild garlic bulb looks when split open.  Very difficult to differentiate from a wild onion.  Luckily, both are edible and good tasting!

How the wild garlic bulb looks when split open. Although difficult to differentiate from a wild onion, both are edible and good tasting!

And the taste?  Today’s sample had a wonderfully strong flavor of garlic with the slight heat you would expect from a standard onion.  Yum!

Remember that while both are edible, I don’t recommend randomly going out and tasting your yard greens without proper education!  You could get a rotten tummy or even poisoned by popping the wrong yard greens into your salads.  So please, take my info at heart, and if you have any question as to plant identification: Stop!  Don’t eat it!  Learn from an expert!

Share this:

  • Click to email a link to a friend (Opens in new window)
  • Click to share on Twitter (Opens in new window)
  • Click to share on Reddit (Opens in new window)
  • Click to share on Facebook (Opens in new window)
  • Click to share on Pinterest (Opens in new window)
  • Click to print (Opens in new window)
  • More
  • Click to share on LinkedIn (Opens in new window)

Like this:

Like Loading...

love tip #6: get your knowledge on

13 Thursday Mar 2014

Posted by Dusty Lynn Baker in love tips

≈ Leave a comment

Tags

Alaska, books, forest garden, hugelkultur, insomniac, knowledge, lifestyle, Mother Earth, Nook, permaculture, Peter Bane, Ross Mars, sustainability, The Basics of Permaculture Design, The Permaculture Handbook

As a relative newcomer to permaculture, gaining knowledge for me is a must.  I’ve always been frugal and concerned for Mother Earth, but this is the first time since leaving high school that I actually have the opportunity and intention to put at least five years of work into a set amount of acreage.  And although I plan to spend a year of the next five in Alaska, by setting fruit trees and hugelkultur (mound) gardening up, I can leave my property in the hands of someone else with just the care for perennials and animals once I have my bases established.

The Permaculture Handbook, Peter BaneForever the insomniac, my Nook is always at my bedside and ready for searches for new books and magazines to bring into my library.  One of my favorites is The Permaculture Handbook by Peter Bane.  Published in 2012, it has the knowledge of a permaculture pioneer with modern reflections on legal and other variables affecting modern organic farming and sustainability and forest farming.

My biggest take in the first year of farming my land?  Knowing how to begin and not getting too dedicated to a specific process.  While I of course have big dreams, Bane stresses keeping things close to the property’s existing buildings in the first years so as to keep the work close at hand.  And he says, if things do get left undone, don’t worry.  The seasons and other factors will start and stop projects as you develop, learn, change and grow with the process.

The Basics of Permaculture Design, Ross MarsSo, when you check it out, don’t get sticker shock!  The book is about $35 but it is also over 600 pages of in-depth knowledge from a renowned permaculturist and educator.

A second book in my favorites is The Basics of Permaculture Design by Ross Mars.  Although published earlier (1996), Mars focuses more on basics of sustainability within 160+ page length.

So get to it!  It’s never a better time than today to learn, practice and live the permaculture lifestyle.

Share this:

  • Click to email a link to a friend (Opens in new window)
  • Click to share on Twitter (Opens in new window)
  • Click to share on Reddit (Opens in new window)
  • Click to share on Facebook (Opens in new window)
  • Click to share on Pinterest (Opens in new window)
  • Click to print (Opens in new window)
  • More
  • Click to share on LinkedIn (Opens in new window)

Like this:

Like Loading...

love tip #5: organic vs. heirloom

24 Monday Feb 2014

Posted by Dusty Lynn Baker in love tips

≈ 4 Comments

Tags

bone meal, cross-pollination, cultured, flowers, gardening, GMO, heirloom, herbs, hybrid, insecticides, natural, organic, Organic Seed People, vegetables

Do you know the difference?  Luckily I do, and last week a day of shopping with my son became a lesson on the true difference between organic and heirloom seeds and plants.

Gourmet Carrot Blend, Photo credit: Organic Seed People

Gourmet Carrot Blend, Photo credit: Organic Seed People

The first difference is in the age and development of the seeds.  Heirloom seeds typically have been passed down 50+ years and are from non-hybrid/GMO plants.  These plant types have grown and developed through natural pollination but may or may not have been grown organically.

Organic seeds have been cultured from either heirloom or hybrid plants.  The plant must have been grown chemical-free using natural compost and insecticides with soap-based sprays and bone meal allowed.

So can you grow heirloom and organic seeds in the same garden?  Yes, BUT, while the heirloom seeds will produce heirloom plants on first run, the resulting plants might be blended with the organic plants and will only remain ‘heirloom’ if both were originally.  AND, the organic seeds will only produce ‘organic’ plants if they are grown and nurtured organically to maturity.

How to make sure your heirlooms remain heirloom?  You need a buffer zone, basically acreage, between you and your neighbors farms and gardens to keep cross-pollination with non-heirloom plants from occurring.  This is a difficult process and the outcome from year to year can be unpredictable.

So look for organic heirloom seeds and if needed, purchases new seeds annually to ensure you are truly getting the best for your family.

Although many heirloom seed producers are not organic, and vise versa, growers such as Organic Seed People offers organic heirloom seeds.  (When visiting their site, be sure to scroll down to the link for ‘Organic Heirloom Seeds.”  The link will bring up three choices: Vegetables, Flowers and Herbs with multiple choices under each.  You must make sure that you don’t get into the wrong area by side-links or you might mistakenly purchase seeds that are not both organic and heirloom.)

* Please note, I do NOT receive compensation for links.  I am merely helping the process in finding viable sources and cannot guarantee products!

Share this:

  • Click to email a link to a friend (Opens in new window)
  • Click to share on Twitter (Opens in new window)
  • Click to share on Reddit (Opens in new window)
  • Click to share on Facebook (Opens in new window)
  • Click to share on Pinterest (Opens in new window)
  • Click to print (Opens in new window)
  • More
  • Click to share on LinkedIn (Opens in new window)

Like this:

Like Loading...

love tip #4: starting seeds indoors

18 Tuesday Feb 2014

Posted by Dusty Lynn Baker in love tips

≈ Leave a comment

Tags

cold frame, commercial set-up, fluorescent, frost, greenhouse, grow bulb, growing station, hot bed, LED grow bulb, seedlings, summer crops, transplant

If you’re like me, you’re already itching to get summer crops growing even though the threat of frost is looming for another two months.  Indoor germination is a great idea, but only if you follow the rules.  Don’t and you will end up with weak starters that won’t survive the transplant to outdoors.  And for those not ready to build  a cold frame or a hot bed greenhouse, a simple set-up indoors will provide a more economical option to purchasing transplants.

photo credit www.gardeners.com

photo credit www.gardeners.com

When setting up a growing station, commercially purchased set-ups are always available, but it’s easier and cheaper to just purchase a two-bulb fluorescent lighting fixture, hooks and chains, hanging the lamp from a ceiling joist and making sure that the chains are long enough to adjust as the height of the plant changes.  Another option is to build a 2×4 or PVC pipe frame to hang the light fixture from.

Fluorescent grow bulbs are available (two 40 watt bulbs per fixture).  In a pinch, one cool white and one warm white bulb, both 40 watt, can be used.  But if you are like me, not only wanting to save money but also to actively be kinder to Mother Earth, LED grow bulbs are available for an eco-friendly option starting at around $50.  Remember that LED costs are higher upfront, but the savings in electricity and lifespan are unbeatable.

Plant seeds according to instructions, keeping the bulbs approximately 6-12 inches above plant height and soon spring will arrive and you’ll be ready to transplant those summer crops!

Share this:

  • Click to email a link to a friend (Opens in new window)
  • Click to share on Twitter (Opens in new window)
  • Click to share on Reddit (Opens in new window)
  • Click to share on Facebook (Opens in new window)
  • Click to share on Pinterest (Opens in new window)
  • Click to print (Opens in new window)
  • More
  • Click to share on LinkedIn (Opens in new window)

Like this:

Like Loading...

love tip #3: easy insect control

15 Saturday Feb 2014

Posted by Dusty Lynn Baker in love tips

≈ Leave a comment

Tags

European Starling, garden, House Sparrow, insect control, love tip, natural, protective nesting, seed, suet, wild birds

It’s easy to tell that I love the wild birds on my property.  But did you know that they are a wonderful addition to your garden insect control?  Birds like house sparrows and starlings are often shunned because of their protective nesting natures, but you can use them to your advantage and now is the time to begin!

European Starling

European Starling

Offer a welcome mat in winter to wild birds by providing seed and suet so that when nesting time arrives, the birds will already see your property as a friendly haven.  Just make sure to do it correctly!

Place feed far enough from your house to prohibit birds from regularly landing and nesting directly on your home, or around kids’ play areas, by feeding them closer to your garden.  Before late winter/spring nesting begins, place bird houses in this same area.  Space them far enough out to prevent dipping at you while gardening, but still surrounding the area you most want controlled.

Voila, you are one with nature and a little less insect heavy in your garden!

Share this:

  • Click to email a link to a friend (Opens in new window)
  • Click to share on Twitter (Opens in new window)
  • Click to share on Reddit (Opens in new window)
  • Click to share on Facebook (Opens in new window)
  • Click to share on Pinterest (Opens in new window)
  • Click to print (Opens in new window)
  • More
  • Click to share on LinkedIn (Opens in new window)

Like this:

Like Loading...
← Older posts
Follow permie love on WordPress.com

Enter your email address to follow this blog and receive notifications of new posts by email.

Join 145 other followers

Instagram

No Instagram images were found.

Recent Posts

  • land ho!
  • Ohio River Valley
  • living on a permaculture farm in Hawai’i
  • and miles to go before I sleep
  • transitions coming my way

Tags

blog Buddha compost edible education flowers forest garden garden gardening garden tour Good Earth Master Gardeners grass greenhouse hugelkultur identification Indiana insecticides knowledge love tip master gardener medicinal Mother Earth Mother Nature natural Ohio River Valley organic perennials permaculture permie love photos plants presentation Purdue Master Gardener Purdue University rain barrel seed seeds snow spring summer sustainability sustainable training travel trees vegetables Washington County weeds woods Zen

Categories

  • blog
  • education
  • Environmental relations
  • in the gardens
  • love tips
  • travel
  • Uncategorized

Create a free website or blog at WordPress.com.

Privacy & Cookies: This site uses cookies. By continuing to use this website, you agree to their use.
To find out more, including how to control cookies, see here: Cookie Policy
  • Follow Following
    • permie love
    • Join 145 other followers
    • Already have a WordPress.com account? Log in now.
    • permie love
    • Customize
    • Follow Following
    • Sign up
    • Log in
    • Report this content
    • View site in Reader
    • Manage subscriptions
    • Collapse this bar
 

Loading Comments...
 

    %d bloggers like this: